

The Gift of South Dakota
Subscriptions to South Dakota Magazine make great gifts!
Subscribe today — 1 year (6 issues) is just $29!
Blessed Sacramints
When I was growing up, no special occasion was complete without platters full of cream cheese mints, arranged in dainty pastel patterns and placed right next to a bowl of mixed nuts. They helped mark the sanctity of marriages and were as mandatory at high school and college graduations as the diploma holder’s cap and gown.
Everything I know about mints I learned from my mother, who has been mixing and molding them since the 1950s. She was a little girl when her mother started making them for Mother’s Day teas in Viborg. In their large family, there were always extra hands around to fill cookie sheets with these candies in almost no time at all.
When I was old enough, I helped, too — though Mom had to keep an eye on me to make sure that more mints ended up on the pan than in my mouth. To tell the truth, she still has to do that. There’s something about the play of textures in these little candies — that crunch of granulated sugar coating the creamy dough — that just begs you to eat another and another.
But the sweetest part of this tradition is the togetherness. Ideally, mint making is a group activity. Depending on the molds you choose, a single batch of dough can make around 200 mints. If you’re doing it alone, that can be a slog, but with a group, conversation and laughter make the task fast and fun.
I realized that anew when a bunch of South Dakota Magazine staffers got together to help me make mints using the recipe my grandmother, Maridell Mark, first stirred up over six decades ago. The stories and smiles we shared will stay in my memory for a long time. I was the only one in the group with experience, but my first-timers took to it easily. If you need help making mints, I highly recommend you give them a call.
You don’t want me. I’ll just eat them all.
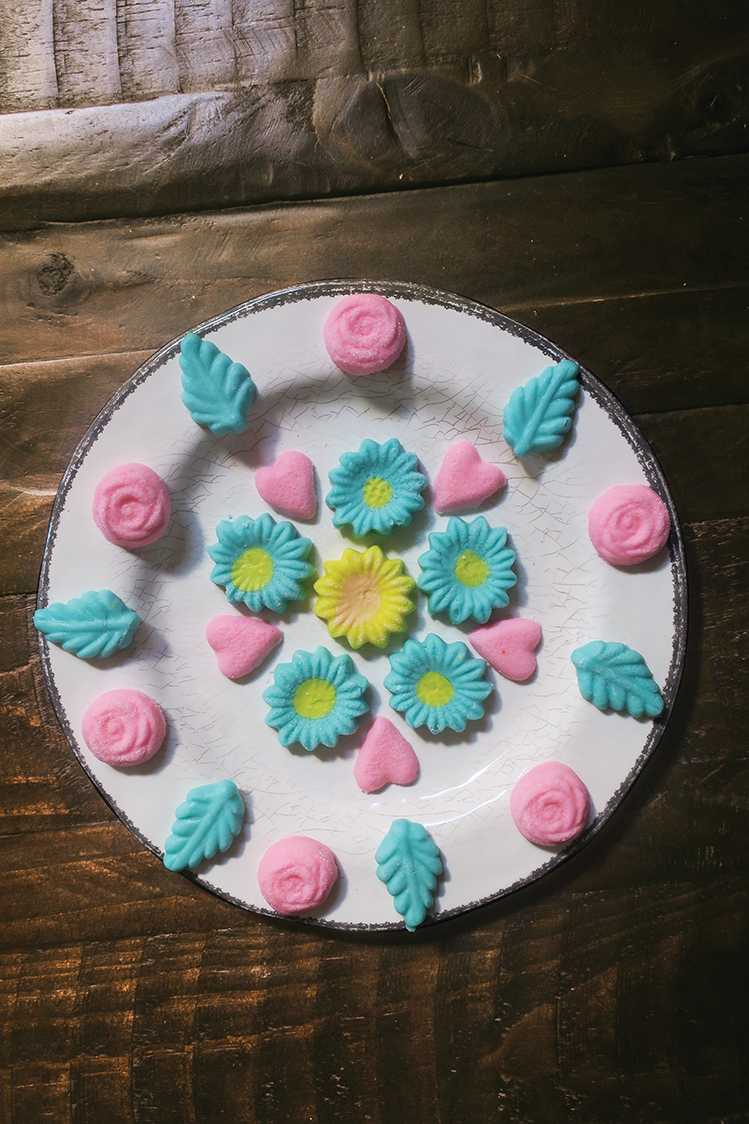 |
| When marking rites of passage, sweetened cream cheese candies are a must. |
Cream Cheese Mints
from Maridell Mark
2 pounds powdered sugar
8 ounces of cream cheese, softened
A few drops of candy oil flavoring, to taste (spearmint is best)
Paste food coloring
Granulated sugar, for rolling
Rubber mint molds
Beat cream cheese and powdered sugar together, adding sugar a bit at a time so you don’t end up with a powdery white kitchen. Add flavoring oil to taste but be careful. The flavor can intensify as the mints set. Six drops of oil are usually enough.
Dip a toothpick into a jar of paste food coloring, wipe the color off onto a ball of dough, and knead it in, adding more dabs of color if needed, until the coloring is evenly distributed, and the dough reaches the desired shade.
Cover a cookie sheet with waxed paper. Add granulated sugar to a small bowl and dust your mold with sugar. Form dough into small balls, roll them in sugar and press them into the mint mold, swiping the excess away with a thumb. To release, tap the mold into your hand or onto the cookie sheet.
Let mints dry for a day, turning them over after half a day. Stack mints in an airtight container, separating each layer with waxed paper. Mints may be refrigerated, frozen or consumed immediately.
Mint Tips
Making mints is simple enough that a small child can help, but here are a few tricks to make it even easier.
- Use paste food coloring. It is more intense than the liquid food coloring typically used for baking. Liquid coloring can add a bitter flavor.
- Go light on color. Bold hued mints just end up dyeing your guests’ teeth and tongues.
- If you would like to make more than one color or flavor of mints, divide the dough or make multiple batches.
- Mint molds come in many shapes. Use whatever you like but be aware that the more ornate the mold is, the harder the mints will be to unmold. Our family has found that roses, simple leaves and diplomas are easiest to manage.
- The size of dough ball you need will depend greatly on the mold you are using. By rolling the dough consistently into the right-sized ball for your mold, you’ll produce more mints in less time and find unmolding easier. Use a small melon baller if you need to.
- If you are struggling to get the mints to unmold, dust your mold in a little granulated sugar.
- Do not be afraid to give the mold a good whack. They are made of rubber, so you’re not going to break anything.
- The drying step is important. It allows the mints to set up enough so that you can stack them in layers and store them until the big day.
Editor’s Note: This story is revised from the May/June 2019 issue of South Dakota Magazine. To order a copy or to subscribe, call (800) 456-5117.


$29 for 1 Year |
 |

Comments